Garden Trellis Designs: 10+ Ideas for Vertical Growing
Garden Trellis Designs: 10+ Ideas for Vertical Growing
Hey there, green thumb gurus and aspiring gardeners! Are you dreaming of a lush, productive garden but feel limited by space? Or perhaps you simply want to add a touch of vertical elegance to your existing landscape? Well, you’ve come to the right place! As your friendly DIY gardening expert, I’m here to show you how transforming your garden with amazing garden trellis designs is not only achievable but incredibly rewarding.
Vertical gardening is a game-changer, allowing you to maximize your growing area, improve plant health, and create stunning visual interest. And at the heart of most successful vertical gardens? The humble, yet mighty, trellis! Forget flimsy, store-bought options – we’re diving deep into DIY solutions that are robust, beautiful, and tailored to your needs. Get ready to elevate your garden (literally!) with these inspiring and practical ideas.
Materials & Tools Needed for Your DIY Trellis
Before we dig in, let’s gather our arsenal. The beauty of DIY garden trellis designs is that you can often use repurposed materials or common items found at your local hardware store.

Here’s a list of common materials and tools you might need:
Materials:
- Wood: Untreated lumber (cedar, redwood, pine) for posts, slats, or frames.
- Bamboo: Sturdy poles for rustic trellises or teepees.
- Rebar or Metal Conduit: For strong, long-lasting structures.
- Netting/Mesh: Garden netting, chicken wire, or hog paneling for vining plants.
- Twine/Wire: Jute twine, galvanized wire, or garden ties for securing plants.
- Hardware: Screws, nails, staples, zip ties, eye hooks, turnbuckles (for tensioned wire).
- Weatherproofing: Exterior paint, stain, or sealant (if using wood).
Tools:
- Measuring Tape & Pencil: For accurate measurements.
- Saw: Hand saw, circular saw, or miter saw (for wood).
- Drill: With appropriate bits for pilot holes and driving screws.
- Hammer: If using nails.
- Wire Cutters: For netting or wire.
- Staple Gun: For attaching netting to wood frames.
- Level: To ensure your trellis stands straight.
- Shovel or Post-Hole Digger: For anchoring posts.
- Safety Gear: Gloves, safety glasses.
Project Duration & Planning Your Vertical Masterpiece
The time it takes to build your DIY trellis can vary greatly, from a quick afternoon project to a weekend endeavor, depending on the complexity of your chosen garden trellis designs. Simple bamboo teepees might take an hour, while a sturdy wooden grid trellis could take 4-6 hours.
Key Planning Steps:
- Assess Your Needs: What plants will you grow? Cucumbers and pole beans need strong support, while peas and clematis are lighter. How much space do you have?
- Choose Your Design: Browse different garden trellis designs (A-frame, fan, grid, arch) and consider how they’ll fit your garden’s aesthetic.
- Measure Your Space: Determine the height and width your trellis needs to be.
- Sketch It Out: A simple drawing helps visualize the project and identify potential issues.
- Gather Materials: Make a shopping list and get everything ready before you start. This saves time and frustration!
Step-by-Step DIY Instructions: Building a Basic A-Frame Trellis
Let’s walk through building a versatile A-frame trellis, a popular choice among garden trellis designs, perfect for cucumbers, squash, or pole beans. This can be adapted for many other designs.

- Cut Your Wood: For a standard A-frame, you’ll need two longer pieces (e.g., 6-8 feet) for the main legs and several shorter pieces (e.g., 2-3 feet) for crossbars. Also, two shorter pieces for the base supports.
- Assemble the Sides: Lay two long pieces on the ground, forming an “A” shape. Place one shorter crossbar near the top and one near the bottom. Drill pilot holes and secure them with screws. Repeat for the second “A” side.
- Connect the Sides: Stand both “A” frames upright. Connect them at the peak with a hinge or by overlapping and screwing them together. For the base, attach the two base supports horizontally between the bottom crossbars of each “A” frame, creating a stable, open-bottom triangle.
- Add Climbing Supports: Now, you can add your climbing surface. This could be:
- Sturdy Twine: Run rows of twine horizontally between the legs, tying them securely.
- Garden Netting: Staple or tie netting to the frame.
- Thin Wood Slats: Screw thin wood slats horizontally for a more robust grid.
- Secure in Garden: Place your completed A-frame trellis in your garden bed. Ensure it’s stable. You can anchor the legs into the soil or secure them to a raised bed for extra stability. If you’re building a raised garden bed, plan your trellis integration during the bed construction.
Benefits & Practical Advantages of Vertical Growing
Embracing garden trellis designs offers a wealth of benefits that go beyond just looking good:
- Maximizes Space: Perfect for small gardens, patios, or balconies, allowing you to grow more in less horizontal space.
- Improved Air Circulation: Plants grown vertically get better airflow, reducing the risk of fungal diseases like powdery mildew.
- Pest and Disease Control: Keeping plants off the ground helps prevent soil-borne pests and diseases from easily reaching foliage and fruit.
- Easier Harvesting: No more bending over! Fruit and vegetables are at a convenient height for picking.
- Cleaner Produce: Fruits like strawberries and cucumbers stay clean and dry, away from the soil.
- Aesthetic Appeal: Trellises add architectural interest and can transform a simple garden into a lush, dynamic landscape.
DIY Variations & Customization Tips
The world of garden trellis designs is vast and full of creative possibilities! Don’t feel limited to a basic A-frame.
Here are some ideas to inspire your next project, incorporating decorative trellises arbor pergola structures:
- Bamboo Teepee: Ideal for pole beans or sweet peas. Simply gather 3-5 bamboo poles, tie them together at the top, and spread the bases in a circle.
- Fan Trellis: Great for espaliered fruit trees or climbing roses. Create a fan shape with slats or wires radiating upwards from a central point.
- Grid Trellis: A classic, sturdy design made from wooden slats or rebar, perfect for heavy vine crops like melons or small pumpkins.
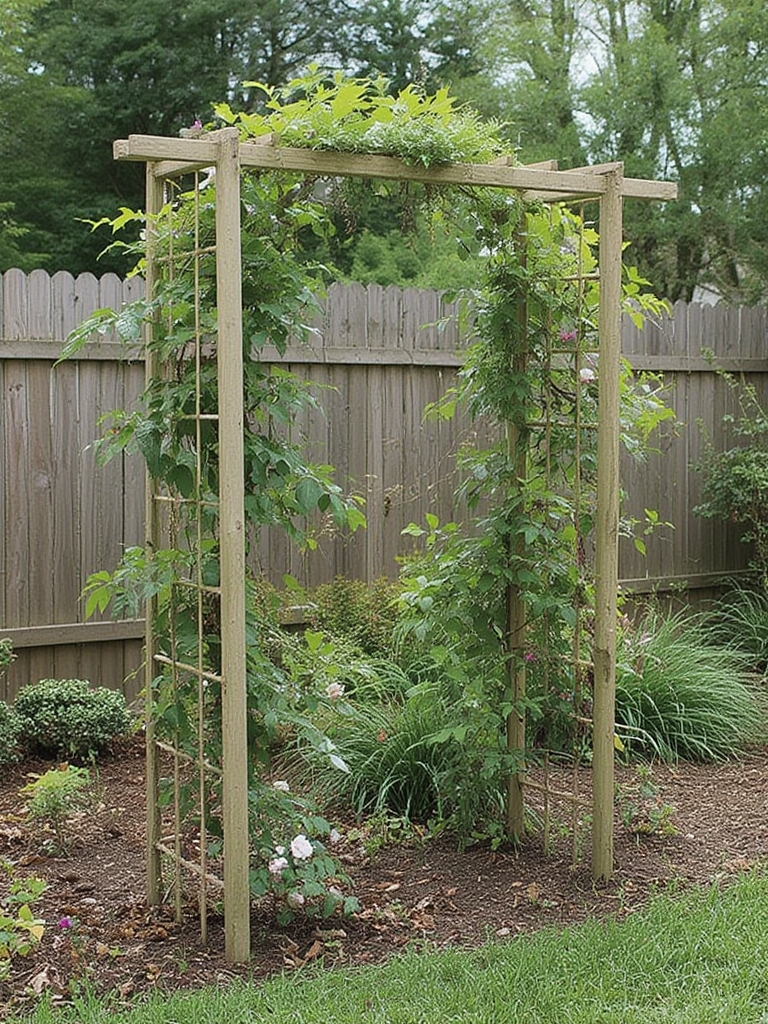
- Cattle Panel Arch: Bend a sturdy cattle panel into an arch over a pathway or garden bed for an impressive entry point for vining plants.
- Pallet Trellis: Repurpose an old wooden pallet by standing it upright. Great for lightweight climbers or mounting small pots.
- Ladder Trellis: Create a rustic ladder using branches or lumber, leaning it against a wall or fence.
- String Trellis: For lightweight plants, run vertical strings from an overhead support (like a pergola or eaves) down to the plant base.
- Rebar or Metal Conduit Trellis: For a modern, industrial look, construct frames from rebar. They are incredibly durable and can be painted.
- Living Willow Trellis: If you have access to willow branches, you can weave a “living” trellis that will root and grow!
- Found Object Trellis: Get creative with old bed frames, bicycle wheels, or even old doors for truly unique decorative trellises arbor pergola structures.
Remember to consider your plant’s needs. Heavy plants need robust structures, while delicate flowers can thrive on lighter ones. Don’t be afraid to paint or stain your wooden trellises to match your garden’s color scheme!
Common DIY Mistakes to Avoid
Even the most seasoned DIYers can stumble. Here are a few common pitfalls when building garden trellis designs:
- Underestimating Plant Weight: A small tomato plant quickly becomes a heavy vine. Build your trellis stronger than you think you need it to be.
- Using Non-Treated Wood: Unless you’re okay with it rotting quickly, avoid untreated wood for ground contact or prolonged outdoor exposure, or apply a weather-resistant sealant.
- Improper Anchoring: A trellis needs to withstand wind, rain, and the weight of your plants. Ensure it’s firmly anchored into the ground or securely attached to a fence/wall.
- Not Enough Climbing Surface: Some plants (like cucumbers) need a grid or mesh to grab onto, not just vertical poles. Ensure your trellis offers ample gripping points.
- Wrong Trellis for the Plant: A delicate string trellis won’t support a sprawling pumpkin vine, and a huge rebar structure might overpower a petite sweet pea. Match the trellis to the plant!
- Poor Placement: Position your trellis where it won’t shade other plants excessively and where it receives adequate sunlight for the climbing crop.
Maintenance & Longevity Tips for Your Trellis
You’ve put in the work; now let’s make sure your garden trellis designs last for seasons to come.
- Inspect Annually: Before each growing season, check your trellis for any signs of rot, loose screws, or weak points. Repair as needed.
- Clean Regularly: Remove old plant debris at the end of the season to prevent disease carryover and make room for new growth.
- Weatherproof Wood: Reapply exterior paint, stain, or sealant every 1-2 years to wooden trellises to protect them from the elements.
- Train Your Plants: Gently guide young tendrils onto the trellis. This early training encourages upward growth and ensures even coverage.
- Consider Winter Storage: If your trellis is lightweight and detachable, consider storing it indoors during harsh winters to extend its lifespan.
- Replace Worn Components: If twine or netting becomes frayed, replace it promptly to maintain support for your plants.
Conclusion: Elevate Your Garden, One Trellis at a Time!
There you have it, fellow gardeners! With a little planning, some basic tools, and a dash of creativity, you can craft beautiful and functional garden trellis designs that will transform your outdoor space. From maximizing yield in compact areas to adding stunning focal points, the benefits of vertical gardening are immense.
So, roll up your sleeves, gather your materials, and get ready to build something amazing. Your plants (and your back!) will thank you. Happy DIY gardening!
FAQs About Garden Trellis Designs
Q1: What plants are best for a trellis?
A1: Many vining plants thrive on trellises, including cucumbers, pole beans, peas, tomatoes (indeterminate varieties), squash, melons, grapes, climbing roses, clematis, and morning glories. Choose a garden trellis designs strong enough for your specific plant.
Q2: How tall should my trellis be?
A2: The ideal height depends on the plant. For most vegetable vines, 5-7 feet is a good range. Taller plants like some pole beans might benefit from 8-foot structures, while decorative vines might only need 3-4 feet.
Q3: Can I use chicken wire for a trellis?
A3: Yes, chicken wire can work well for lighter vining plants like peas or sweet peas. However, it might not be strong enough for heavy fruits like cucumbers or melons, which require sturdier mesh or a robust frame.
Q4: How do I anchor a freestanding trellis?
A4: For stability, dig holes for the trellis posts and bury them at least 1-2 feet deep, backfilling with soil and tamping it down firmly. You can also use concrete for a permanent fixture, or attach the trellis to a nearby fence or wall with appropriate hardware.
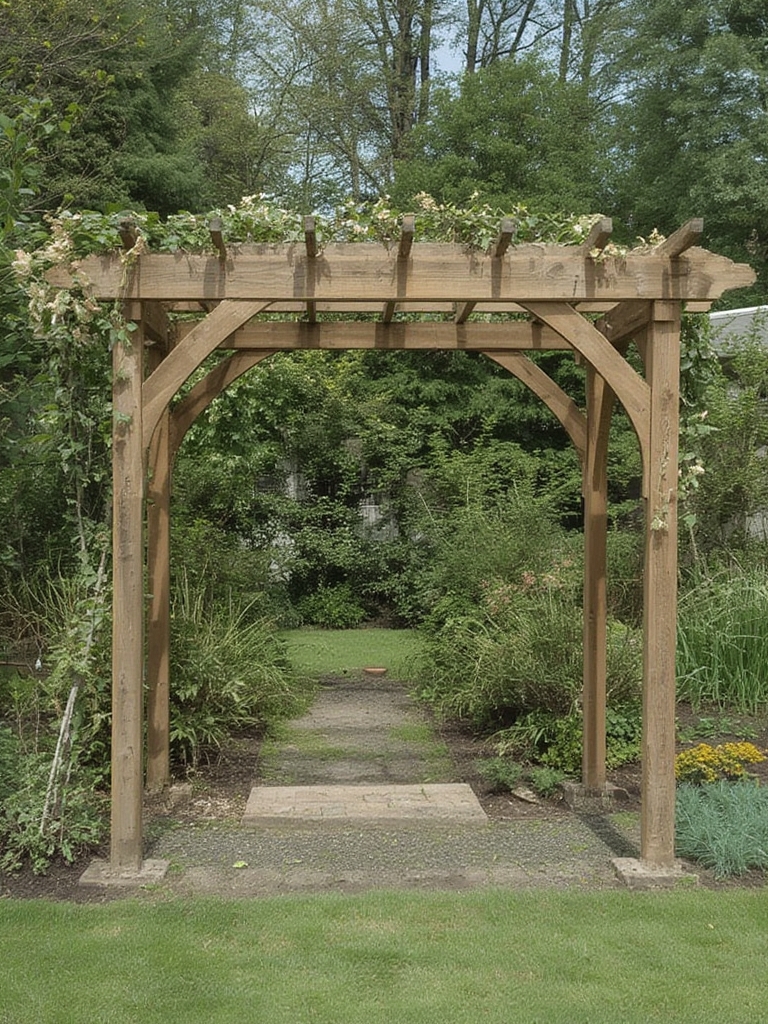
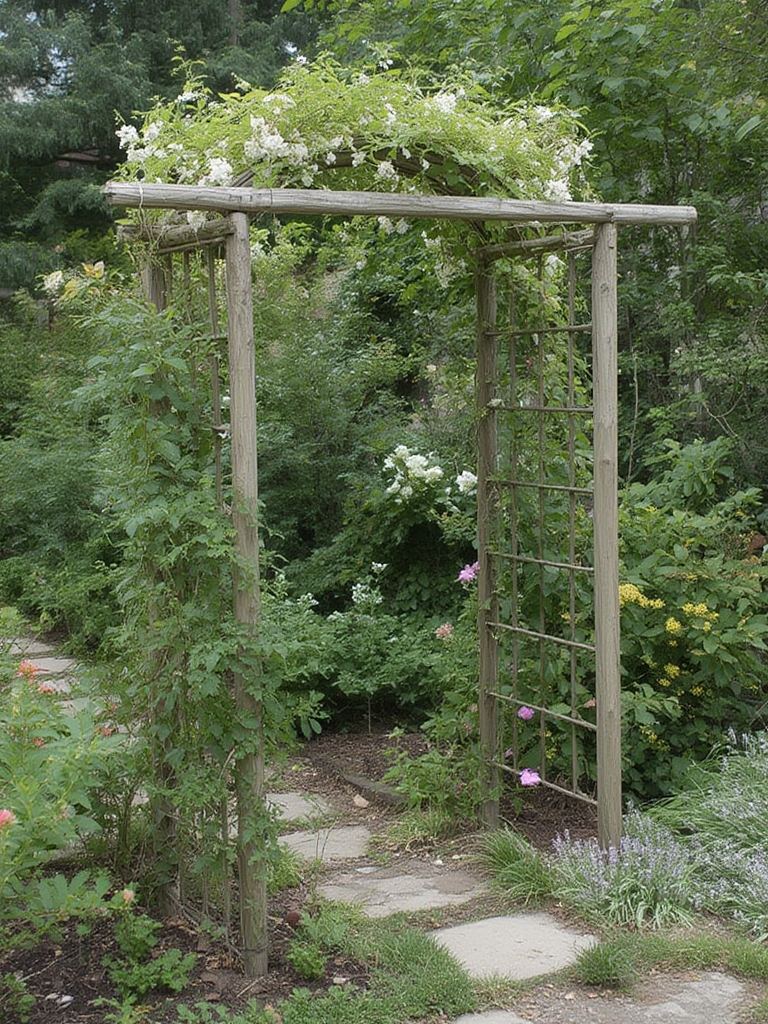
Q5: What’s the difference between a trellis, arbor, and pergola?
A5: A trellis is typically a flat or A-frame structure designed for plants to climb. An arbor is usually a freestanding archway, often over a path, supporting climbing plants. A pergola is a larger, open structure with a slatted roof, providing partial shade and support for multiple climbing plants, creating an outdoor living space, often integrating decorative trellises arbor pergola structures as part of its design.